
PHP memory limits prevent poorly written scripts from using all of the memory resources on the server. To avoid PHP memory limit errors all WordPress sites should set memory limit values to 256MB via the wp-config.php, .htaccess or php.ini files.
Adjusting this value will satisfy the memory requirements of popular plugins like WooCommerce, WPML, Multisite and site builders. This prevents your site or admin dashboard from displaying the Fatal error: Allowed memory size of XXXXXXXX bytes exhausted (tried to allocate XXXX bytes) error message.
The default 40MB from WordPress is simply not enough memory to meet the demands of complex plugins and administrative actions in your WordPress dashboard. Thankfully there are 4 ways you can adjust these limits in WordPress.
Fixing PHP Memory Errors
1. PHP Memory Limit Error Causes
In order to prevent poorly written scripts from using up all the memory resources on your server a maximum memory limit (per script) is enabled by default. Out of memory errors are caused when scripts try to utilize more memory than wordpress has allocated.
By default wordpress sets PHP memory limits to 40MB for a single site and 64MB for multisites. Scripts that violate those thresholds cause error messages to show up like this one.
Fatal error: Allowed memory size of 33554432 bytes exhausted (tried to allocate 6969 bytes)
2. Recommended Memory Limit Settings
Changing your memory limit setting increases PHP Memory only for WordPress, not other applications. Furthermore, you will need to change the memory values for both your public pages and admin dashboard.. When executing administrative tasks (admin dashboard) more memory is often necessary.
A 256MB Limit and 512MB MAX Limit (wp-config.php) would be appropriate on shared hosting. Popular plugins like WooCommerce, WPML, multisite and most site builders require 256M to run properly.
If you are on a Cloud, VPS or Dedicated server you might wish to increase memory limits for public and admin even further. Limits could be increased to 512M for public pages and 1024M for the admin dashboard.
-
- define( ‘WP_MEMORY_LIMIT’, ‘256M’ );
- define( ‘WP_MAX_MEMORY_LIMIT’, ‘512M’ );
By default, WordPress will attempt to increase memory allocated to PHP to 40MB (located in /wp-includes/default-constants.php) for single site and 64MB for multisite, so the when editing your (located in root directory) wp-config.php you should enter an input higher than 40MB / 64MB respectively.
3. Public vs Admin Memory Limits
WordPress distinguishes between public facing page memory and admin memory by adding “MAX” to the code. It’s a terrible naming scheme dating back to WordPress 2.5, but nobody dares change it now.
- define(‘WP_MEMORY_LIMIT’, ‘256M’); Public Page Memory
- define( ‘WP_MAX_MEMORY_LIMIT’, ‘512M’ ); Admin Dashboard Memory
4. Bytes to MegaBytes Conversion Chart
If your website sends out an error message with specific byte sizes you can use this handy Bytes To Megabytes Conversion Calculator tool to estimate what memory limit has been exceeded.
1 byte is also equal to 0.00000095367432 megabytes = 2-20 megabytes in base 2 (binary) system.
| Memory Limit Bytes | Megabytes |
|---|---|
| PHP: Fatal Error: Allowed Memory Size of 4194304 Bytes Exhausted | 4 MB |
| PHP: Fatal Error: Allowed Memory Size of 8388608 Bytes Exhausted | 8 MB |
| PHP: Fatal Error: Allowed Memory Size of 16777216 Bytes Exhausted | 16 MB |
| PHP: Fatal Error: Allowed Memory Size of 33554432 Bytes Exhausted | 32 MB |
| PHP: Fatal Error: Allowed Memory Size of 67108864 Bytes Exhausted | 64 MB |
| PHP: Fatal Error: Allowed Memory Size of 134217728 Bytes Exhausted | 128 MB |
| PHP: Fatal Error: Allowed Memory Size of 268435456 Bytes Exhausted | 256 MB |
| PHP: Fatal Error: Allowed Memory Size of 536870912 Bytes Exhausted | 512 MB |
| PHP: Fatal Error: Allowed Memory Size of 1073741824 Bytes Exhausted | 1024 MB (1GB) |
5. Accessing wp-config.php / php.ini / .htaccess
There are three ways you can easily access the needed wordpress files to adjust memory limits. You can access files using your control panel (Cpanel) after logging into your host, use an FTP program like Filezilla or install a wordpress plugin.
Navigate to the root directory of your wordpress installation. If you are in the control panel you might to click on the “View” link in the upper right corner and make sure the checkmark for “show hidden files” is selected.
- Cpanel – Control panel in your hosting admin dashboard
- Filezilla – Free FTP software to transport files
- WPCF – Free plugin that allows you to edit wp-config
6. Edit Your wp-config.php File
Accessing wp-config through Cpanel is the easiest method of changing your memory limit values in wordpress. It is located in the root directory of your wordpress installation after scrolling down to the bottom. Right click on the wp-config.php file, paste the memory limit values we provided and click save.
Alternatively you can use the search option (upper right corner) by typing in “wp-config” exactly as show and clicking “Go”. You also have the option to search through “All Your Files” or in a specific directory by clicking the drop down arrow.
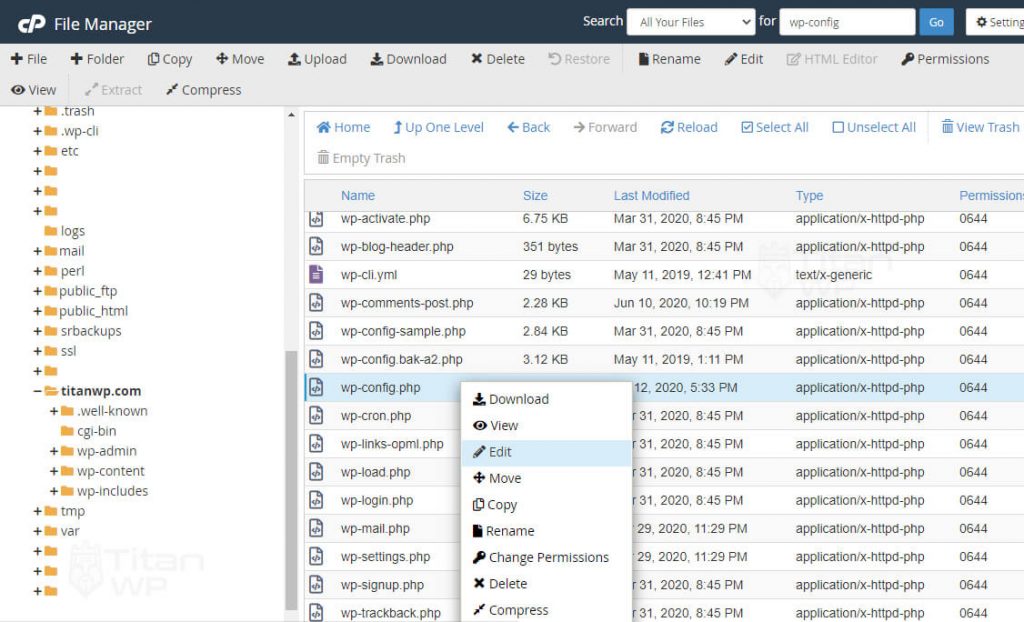
Add this right above the line that says /* That’s all, stop editing! Happy publishing. */
define('WP_MEMORY_LIMIT', '256M');
define('WP_MAX_MEMORY_LIMIT', '512M');

Your server PHP memory limit will be different than your wordpress memory limit. Your host will set the server memory limit for all applications. Editing the wordpress memory limit settings only applies to wordpress.
7. Edit Your php.ini File
If you have access to your php.ini file, change the memory limit value. If you don’t have a php.ini file you can create one. If your line shows 40MB or 64MB try changing the value to “256M”
memory_limit = 256M ; Maximum amount of memory a script may consume (64MB)
Creating a php.ini file can be done by navigating to your yourdomain/wp-admin and clicking +FILE (top left corner) in cpanel. Name the newly created file “php.ini” and click “create new file”.
8. Edit your .htaccess File
If you don’t have access to PHP.ini or prefer not to edit wp-config.php try adding this to an .htaccess file:
php_value memory_limit 256M
The .htaccess file is located in your root directory. You can add your code right above “# END WordPress” at the bottom of the file.
9. Edit Using WPCF Plugin
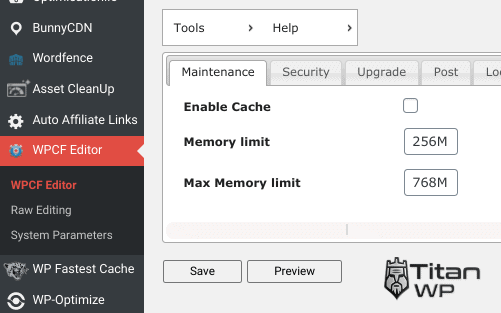
Its generally bad to use plugins for tasks that you can easily do manually. If you just can’t seem to figure out how to change the wp-config using cpanel or FTP you can use a handy plugin called WordPress Config File Editor (WPCF).
After downloading and activating the plugin you can edit the wp-config by editing the memory limit (public pages) and max memory limit (admin dashboard) in the field boxes provided. Recommended values are 256M and 512M respectively.
10. Contact Your Host
Should you not feel comfortable in trying the above methods, or the above did not work for you, you need to talk to your hosting about having them increase your memory limit.
Some hosts do not allow changing your PHP memory limit, in which case you would have to contact your hosting support by emailing or opening a support ticket. Other (shared) hosts put a cap of 756M on the allowed memory limit. If you have Cloud, VPS or a Dedicated server these limits can be increased even further.
11. Troubleshooting Memory Limit Errors
If you have recently added a plugin to wordpress and encountered the fatal error memory limit message there is a high probability the culprit is the plugin you just installed. If you have increased your memory limits to 1024M and are still getting fatal error messages, its time to get serious about troubleshooting.
What about memory error messages that seemingly come out of nowhere?
Without getting too technical two options exist for detecting plugins that eat up server resources. One well known scan is P3 Profiler which scans the load time and query count of all the plugins used during your site load. The only trouble is its outdated, with 3 major WordPress releases since its last update.
A second option Query Monitor requires a bit more technical knowledge. It provides a wealth of information about your server and database configuration, peak memory usage and query count. This information combined with a basic waterfall chart from GT Metrix or Pingdom can help out big time.
In case you didn’t already know certain plugins are well known resource hogs. Here are some that make the list.
- Wordfence (Security/Firewall)
- BackupBuddy (Backup Programs)
- Site Builders (Divi, Elementor, Flatsome, Beaver)
- WooCommerce (Ecommerce store)
- BuddyPress (Forums & Message Boards)
- Disqus (Commenting)
- Add This (Social Media)
- Revolution Slider (Slider Plugins)
12. Memory Limit Key Points
- Wordpress separates memory limits by public pages (WP_MEMORY_LIMIT) and admin pages (WP_MAX_MEMORY_LIMIT)
- Admin pages (dashboard) require more memory than public pages (your website).
- By default WordPress allocates 40MB of memory. Change this to 256M (public pages) and 512M (admin pages) in wp-config.php
- Several plugins are known resource hogs and should be avoided or substituted for light weight options.
- WooCommerce, WPML, Multisite, Forums and Site Builders require a minimum of 256MB.
- Most hosting companies allow you to increase memory limits (some don’t) so contact your host as needed.
- WordPress memory limits are set on a per script basis, not the combined total. Limits are ultimately capped by your server resources.
- The easiest way to change memory limits is through cpanel and editing wp-config.php file in your root directory.
I write tutorials about wordpress, speed, SEO and marketing, With over a decade of experience I’ve learned a lot and I’d like to share my knowledge with you.